
The Backpacker Meal Koozie
- Michael Chamberlain
- Nov 23, 2023
- 7 min read


A set of koozies! Trying to be as efficient as possible with our gear, making a set of koozies for both your cook pot and backpacker meal will use less fuel and decrease the amount of time needed to boil water and cook meals.
When out in the backcountry or on the trail, efficiency is very important. Wasted effort means energy spent that we cannot get back. It may mean less energy for a thru hiker to get in that extra mile or less energy for the backcountry hunter to get over the next ridge-line. With all of our focus on becoming more efficient with all our gear, why would we not extend this to food prep? When we place our focus on efficiency during meal prep, we are concerned about decreasing the time it takes to boil water, decreasing how much fuel is consumed during the boiling process, and decrease the time it takes for meals to sit and rehydrate. Heat loss is the biggest culprit for decreased efficiency in the meal prep times and energy. If we can reduce heat loss when boiling water, that means that our burners will use less fuel, increasing the life of our fuel canisters. For thru hikers, this means less time going into town for refills and more time out on the trail. Less time needed for our meals to sit and “cook” means we get to eat sooner! You can also keep the meal in the insulated koozie while you are eating it so it stays warmer for longer!
One of the greatest things about this project, it is cheap! There are not many materials needed in order to make one of the backpacker meal koozies. For around $20-$30 at your local hardware store you can get everything needed. The list of materials is: double reflective insulation, foil tape, Velcro strips. That’s it! Now, one might say that $20 is a lot just for a backpacker meal koozie, but I am also going to make a insulated koozie for my cook pot while I am at it. I can make a bottle parka for my Nalgene bottles to keep them from freezing in cold weather and an insulated pouch to store my phone in for those long cold nights.
From a cost effective standpoint, similar products for sale on the market range from $20-$40. You can get a couple of premade koozies that are going to cost you about the same price as the material cost to make just one insulated backpacker meal koozie. The quality of this product is unknown, so making your own allows you to be in complete control of the quality of the product. You can also customize it your specific needs when you make it yourself. The difference, for the cost of materials, is that I can make more than one koozie for a backpacker meal as well as a koozie for my cook pot, water bottles, and phone. I can give them to my hiker and hunting companions so they to can be more efficient in the cooking set up.
Now let’s get started!


In order from top left to bottom right. The materials are cheap and easy to come by at your local hardware store. Three materials are needed: reflective insulation, foil tape, and Velcro strips. I bought enough materials to be able to make both the backpacker koozie and cook pot koozie. I can also make multiples for friends or field test my designs and still have material left over to make any new edits of the design.
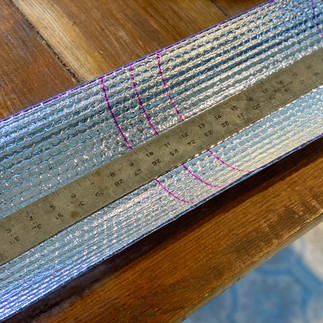
I am going to start with the backpacker meal koozie. It all starts with planning and measuring. The largest backpacker meal I have is the Peak Refuel, so I measured the height and width of one of these meal bags. The meal pouch is 9 ½” tall by 9” wide. For my design, I am considering a few things: 1. I want it to be able to stand upright while the meal is “cooking” after pouring in the boiling water. To accommodate that, I have an accordion fold on the bottom to enable it to stand. 2. I also want a flap over the top to attach with Velcro. This will allow me to fold the top over and seal it closed, keeping all the warmth inside so my meal will not lose heat and cook quicker. So, I cut a piece of the insulation 9 ½” wide and left the length of this the standard width of the roll which is 24”. I could now fold 9 ½” for the front, 3” for the bottom, and 11 ½” for the back, this would include the 9 ½” for the back and 2” for the flap. I have a 3 fold accordion fold on the bottom to allow the bag to stand. Each of these folds are 1 ½”, making the bottom 3" in width. I laid all of this out with a purple sharpie and then cut two strips of foil tape to 9 ½”. These foil tape strips will cover the seams on the sides.


Now time to add the Velcro strips. These strips will seal the top of the koozie, preventing heat loss so the meal will hopefully "cook" faster.
After the sides are all sealed up with the foil tape, now it is time to add the Velcro strip to be able to seal the flap over the top to keep the heat in while the meal "cooks". Knowing that my koozie is 9 ½” wide, I cut the Velcro strips to be slightly under at 9" in length. I started with attaching the strip the bag side by removing the sticky protector and pressing it down. I then removed the other sticky strip that was going to be stuck on the flap, I folded the flap over, and pressed hard. Super simple design, very easy to make, and also very easy to clean! Now it is ready for the field and to dress it up with any stickers or Sharpie artwork you can think of! If you want to take it to the next level, you could sew scrap fabric together to make an outdoor cover that will hide the reflective bubble wrap.
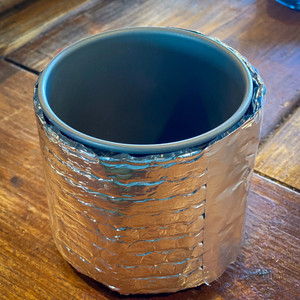
Now we move onto the cook pot koozie. Again, this starts with measuring your cook pot. Most backpacker cook pots are all around the same size, but I would measure according to your specific cook pot. The awesome thing is, if you have more then one cook pot that is fine! Make more! This koozie will live with my cook pot. I have the MSR Pocket Rocket 2 kit where everything, including the 8oz fuel canister, fits in the cook pot. For packing up, I can store everything in the cook pot, put the lid on, and slide this koozie back over top, storing it attached and helping keep everything contained inside. Now while I am hiking in the field, I do not have to worry about the lid coming off and everything being stored inside spilling out into the inside of my hiking backpack.


I made my koozie 3 3/4" high. Only time will tell if that is too close to the bottom of the cook pot and too close to the burner. I could easily cut it down 3 1/2" or 3" in height if I was concerned about it burning and melting.
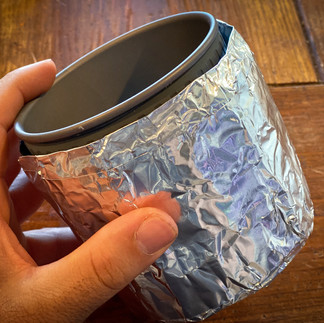
Step by step above outlines the measuring of the height of my cook pot. I decided to make my koozie slightly under this height. I wrapped the reflective insulation around the cook pot, not too snug though. If it is too snug it will not be able to be removed easily after the water has started boiling. I used the standard 24" width of the reflective insulation as the starting length for the koozie, knowing that I will wrap it around and have about an 1" of overlap that I will then cut and use the foil tape to secure in place.
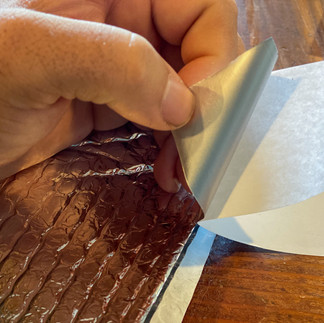
Once the outside of the cook pot is insulated, it is now time to move onto the lid. Since the MSR kit I have came with a plastic lid, I thought I would use this as the base for the insulated lid. The plastic lid is hard and sturdy, so it will add the needed structure to the very flimsy reflective insulation. By cutting a slit in the reflective material on the lid, I could use the handle on the plastic lid to lift off the entire koozie.


Step by step picture directions on how I made the insulated top for my cook pot koozie. Heat loss while boiling water comes out of the top of the pot by way of steam, so insulating the top of the koozie is very important.
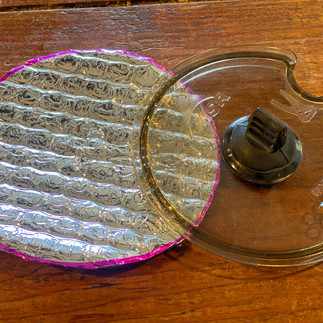
Using the to of the pot or even the lid, I traced a circle that would then rest on top of the rigid plastic lid that came with the cook pot. Using nice, sharp scissors I cut out the circle and in the middle cut a slit so the rubber handle of the pot lid could poke through. This will act as the handle to remove the insulation in order to pour my boiling water into backpacker meal packet. I can now move onto securing the top to the outside by using foil tape. I cut small strips of tape and started with taping the top to the side, then to secure that tape I taped around the outside with long piece of tape to keep the small strips from fraying up and off.


Taping the top on was a little tedious since it is circular. I used smaller strips and then wrapped the outside to secure those strips down to the sides.
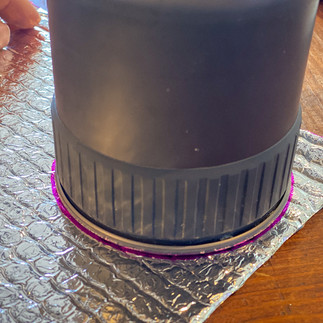
Now the lid and koozie are easily removed to be able to add water, dump water into my backpacker meal pouch, or into a cup to drink. The great thing about this koozie is I can flip it around have the mouth open to be able to drink any coffee or hot chocolate that I make on the trail. Just have to take out the plastic lid, flip the koozie around, and slide it on from the bottom. Now no burnt hands while enjoying your morning cup of hot joe on the trail or in the backcountry. With the material being reflective insulation, these two koozies will also be easy to wipe out and clean incase there is a little spill while cooking and eating.


Now the koozie can be flipped and keep your hot beverage hot and protect your hands from being burned. No need to pack more than one cup now. I can use my cook pot tongs to lower the hot cup into my koozie and enjoy!
Now the only thing left to do is use it and enjoy all the items you can more efficiently cook while on the trail! Tag me in your Instagram photos of you using your new koozie and as always reach out to let me know any successes, failures, and how you made this simple design work for you. Happy hiking!


Comments